To continue our journey to Moodle on Oracle Cloud Infrastructure using Ampere compute instances and MySQL HeatWave Database Service [1] [2], in this article we will see how to scale our architecture using multiple Moodle instances, High Availability for the Database and Read Scale-Out.
This is the architecture we will deploy:

The same principles can be applied to other projects, not just Moodle.
Multiple Compute Instances & MySQL HeatWave High Availability
The first step is to use again the Stack to deploy the initial resources. We must insure that we use a MySQL Shape that has at least 4 OCPUs to later enable Read Replicas (see [2]):
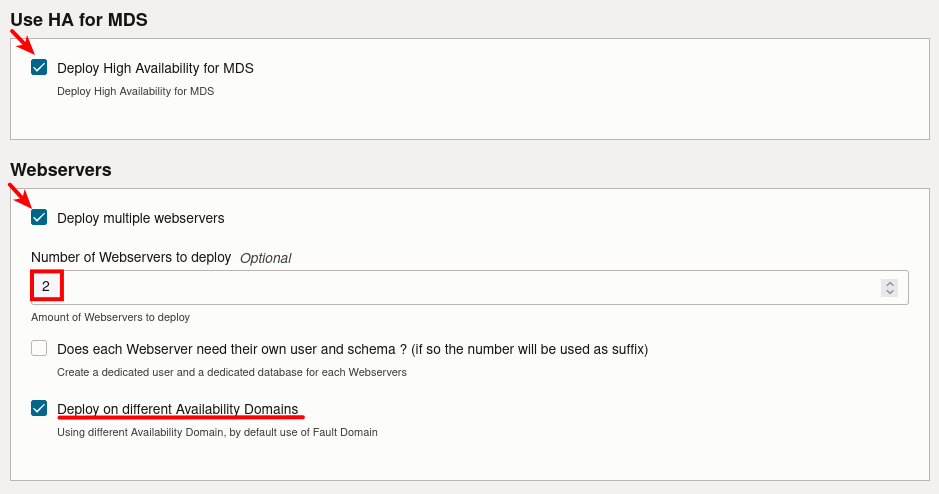
For the Compute Instances where Moodle will be installed, we use Ampere Shapes:

When deployed, we can see that now the MySQL HeatWave instance provides High Availability:

This means that there are now 3 servers in a MySQL Group Replication cluster. In the event of failure of the primary member, another node in another availability zone will automatically take over the primary role.
Shared Storage
All Moodle instances will connect to the same database instance running in MySQL HeatWave Database Service, but they also need to share several files that are usually stored locally on the web server.
To share that particular content with all the deployed Moodle web servers, we will use a NFS mount.
In OCI, we can easily create a File System to be mounted on each web servers:

We need to specify that we will use it for NFS and we provide a name for the export:

Once created we can check the Exports:

And on the export, we can get the information about the mount commands and the ports we need to open in the security list:


Please note the IP of the NFS Server, we will need it.
Mounting the NFS share
Before being able to mount our new NFS share, we need to allow the connections in the private subnet:

We need to have the following Ingress Rules:

And the following Egress Rules:

When the Security List is created we need to associate it with the private subnet:


When the security list is added, we need to connect in SSH on all the Compute Instances we deployed for Moodle. In this example we have 2 instances:

You can refer to the previous post to learn how to get the private ssh key to connect to the compute instances using their public IP.
The mount point (/var/www/moodledata) is already created, but we need to install nfs-utils:
[opc@moodleserver1 ~]$ sudo dnf install -y nfs-utilsWe can now mount it:
[opc@moodleserver1 ~]$ sudo mount 10.0.1.61:/FileSystem-moodledata /var/www/moodledata
[opc@moodleserver1 ~]$ sudo chown apache. /var/www/moodledata
It’s also possible to add this in fstab to mount it automatically. Add the following line to /etc/fstab:
10.0.1.61:/FileSystem-moodledata /var/www/moodledata nfs defaults 0 0Please note that 10.0.1.61 is the IP we received the from the mount commands when we created the filesystem.
We also need to tell SELinux to let Apache (httpd) use the NFS mount:
[opc@moodleserver1 ~]$ sudo setsebool -P httpd_use_nfs=1We need to perform this operation on all Compute Instances where Moodle is deployed.
When this is done, we can complete the Moode installation using the public IP of one of the Compute Instances in our browser:

Network Load Balancer
For the moment, we can access our Moodle Compute Instances individually using the public IP assigned to them. But now we’re going to set up a Network Load Balancer and use this new public IP to access our Moodle site. We’ll end up on any of the instances.


We use a listener on port 80 in TCP:

Now it’s time to add backends:

We choose our two Moodle Compute Instances as backends:

When they are selected, we can continue:

We also need to define a health check. You can notice that I’m using 303 as status code, as there is a redirect when we reach the root of Moodle:

And we can create the Network Load Balancer:

Once created, the Network Load Balancer will perform the health check and will be ready. A new public IP will be assigned to it:

This is the new IP used to visit our Moodle site.
Read Scale-Out
The load is already spread over multiple Compute Instances of Moodle. In case of a failure, we are covered with HA. Additionally we can also send all the reads to different MySQL HeatWave instances: Read Replicas.
To deploy read replicas, you can refer on this post. Don’t forget that you need to modify the Moodle DB’s configuration on each Moodle Servers.
Our MySQL HeatWave Instance looks like this now:

And we have 4 endpoints, 1 for each read replicas, 1 for the read replica load balancer and 1 for the primary member of the HA cluster, for the writes:

Conclusion
In conclusion, deploying multiple instances of Moodle on Oracle Cloud Infrastructure using MySQL HeatWave Database Service is a highly effective and robust solution for ensuring high availability and excellent performance of your e-learning platform. The system’s resilience and scalability make it a fantastic choice for managing heavy traffic and dynamically changing loads.
With MySQL HeatWave, you benefit not only from the power of the world’s most popular open-source database, but also from the added advantage of a robust high availability solution and the elasticity of having multiple read replicas to boost read operations and increase data redundancy. This strategy dramatically improves performance and reduces the risk of data loss, enabling you to offer a seamless, uninterrupted learning experience. And don’t forget that if you need even more performance, you can also activate HeatWave Cluster, the in-memory query accelerator available on OCI.
And of course the same architecture can be used for any other products like WordPress, Drupal, Joomla! and more !
Enjoy Moodle, MySQL HeatWave and OCI !